Rules
Rules identify specific data collected from a Cloud Account during a Scan. Configuration Manager uses two types of Rules:
-
Inventory Rules collect data used to validate configurations and manage change.
-
Policy Rules collect data that is evaluated by Policies to measure compliance.
When CM scans a Cloud Account with a Rule, it stores the retrieved data as one or more Elements. CM compares an Element against previous versions to identify changes, or validates an Element against Policies to measure compliance.
|
Note: |
For an overview of Rules, Policies, and other types of content see Getting Started with Custom Content. |
|---|
Working with Rules
On the Rules page, you can work with existing Rules or create your own. Rules created by Tripwire (Author=Tripwire) are read-only, but you can duplicate them and then edit the duplicates.
-
Navigate to Environment > Policy Management and select the Rules tab.
-
Click New.
-
In the New Rule dialog, complete these fields:
-
Name
-
Description
-
Is Prerequisite
-
Prerequisite Rules
-
Loop Over Context
For information about these settings, see General Rule Settings.
-
-
For Policy Rules, leave the Rule Groups field blank.
-
Select a Rule Type based on the type of Cloud Account this Rule will monitor.
Complete the additional fields for the selected Rule Type. For information about these settings, see Rule Type Settings
-
Enter an optional JMESPath Filter and/or Response Script for the Rule. See General Rule Settings for more information.
-
Leave Split Elements unchecked for Policy Rules.
-
Click Save.
Next you can debug the Rule by scanning a Cloud Account to validate the data returned.
-
To debug the Rule:
- Click Debug on the bottom of the page.
- On the right side, under Retrieve Rule Debug, select an appropriate Cloud Account for this Rule Type.
Click Execute to scan the specified account and display the output.
If necessary, edit the setting on the left side of the dialog until you get the results you want.
- Click View Logs to view the logs generated by running the Rule.
- Once you're satisfied, click Save again.
To scan a Cloud Account with the new Policy Rule, you need to link it to a new or existing Policy. For more information about creating or editing Policies, see Working with Policies.
-
Navigate to Environment > Policy Management and select the Rules tab.
-
Click New.
-
In the New Rule dialog, complete these fields:
-
Name
-
Description
-
Is Prerequisite
-
Prerequisite Rules
-
Loop Over Context
-
Rule Groups
For information about these settings, see General Rule Settings.
-
-
Select a Rule Type based on the type of Cloud Account this Rule will monitor.
Complete the additional fields for the selected Rule Type. For information about these settings, see Rule Type Settings.
-
Enter an optional JMESPath Filter and/or Response Script for the Rule. See General Rule Settings for more information.
-
To generate multiple elements with this Rule, select Split Elements and fill out the associated fields:
-
Element Name Filter
-
Element Unique ID Filter
-
Attributes Filter
For information about these settings, see Split Elements Settings.
-
-
If you want to display the element data in a chart, select Dashboard Definition and fill out the associated fields:
-
Element Type Name
-
Element Type Name (Plural)
-
Charts
-
Columns
For information about these settings, see Dashboard Definition Settings.
Note:
You must enable Split Elements in the previous step in order to enable Dashboard Definition.
-
-
Click Save.
Next you can debug the Rule by scanning a Cloud Account to validate the data returned.
-
To debug the Rule:
- Click Debug on the bottom of the page.
- On the right side, under Retrieve Rule Debug, select an appropriate Cloud Account for this Rule Type.
Click Execute to scan the specified account and display the output.
If necessary, edit the setting on the left side of the dialog until you get the results you want.
- Click View Logs to view the logs generated by running the Rule.
- Once you're satisfied, click Save again.
To scan a Cloud Account with the new Inventory Rule, you need to add it to a new or existing Scan on the Schedules tab of the Cloud dashboard.
- Navigate to Environment > Policy Management and select the Rules tab.
- Select the Rule you want to edit and click Edit.
- In the Edit Rule dialog, make changes to the Rule. For more information see:
-
Click Save.
Next you can debug the Rule to check your changes.
-
To debug the Rule:
- Click Debug on the bottom of the page.
- On the right side, under Retrieve Rule Debug, select an appropriate Cloud Account for this Rule Type.
Click Execute to scan the specified account and display the output.
If necessary, edit the setting on the left side of the dialog until you get the results you want.
- Click View Logs to view the logs generated by running the Rule.
- Once you're satisfied, click Save again.
Changes to a Rule will be reflected the next time the Rule (or a Policy that uses the Rule) is used in a Scan. The Policy Tests Associated field at the bottom of the Edit Rule dialog shows the Policy Tests that use this Rule to collect data.
Rule Reference
General Rule Settings
|
Name |
The name of the Rule. Any elements created by the Rule will use this name unless you use the Split Elements settings to split the results into multiple elements. |
|
Description |
A description of the Rule. You can use standard Markdown formatting here, and see the results in the Preview field. |
|
Is Prerequisite |
A Prerequisite Rule doesn't collect and store data in Elements like other Rules. Instead it collects data that can be used by multiple non-Prerequisite or Primary Rules. Each time CM runs a Scan, it first runs all of the Prerequisite Rules associated with that Scan. Then non-Prerequisite Rules run using the data already collected. This approach minimizes the time and system resources required for a Scan. Note: If a Prerequisite Rule fails during a Scan, CM will stop the Scan before any more Rules run. |
|
Prerequisite Rules |
If the Rule depends on any Prerequisite Rules, select them in this field. If a Rule depends on data collected by a Prerequisite Rule, and that Prerequisite Rule is not specified here, the Rule will fail. |
|
Loop Over Context |
If a Prerequisite Rule returns an array as a particular variable, a Primary Rule can loop through that array using the JMESPath expression specified here and perform an action on each item in the array. For example, if a Prerequisite Rule returned a list of users in a "users" key, a primary Rule could then specify "users" as the Loop Over Context. When the Primary Rule runs, it runs on each user in the key to extract additional information. To access the UserName value for each user, you could access that value by using "${loop.UserName}" in the Rule. |
|
Rule Groups |
Rule Groups organize Inventory Rules in the same way that Policies organize Policy Rules. When running a Scan using Inventory Rules, Rule Groups specify which Rules are used in the Scan. For Inventory Rules, add the Rule to one or more Rule Groups here or you won't be able to use it in a Scan. For Policy Rules, leave this field blank. |
|
Rule Type |
Select a type here based on the type of Cloud Account this Rule will monitor. Each rule type uses a different approach to extract data, so the Settings fields below this one will change based on the Rule Type selected. To read more about these rule types and the options available to them, see Rule Type Settings. To use a Custom Script to retrieve data, select Custom here and select a Retrieval script. |
|
JMESPath Filter |
Enter an optional JMESPath expression that can be used to filter the data extracted by the Rule. |
|
Response Script |
Select a Custom Script here to enable remediation for this Rule. Only Change Response scripts can be selected. For more information, see Custom Scripts. |
Split Elements Settings
|
Split Elements |
By default, the results returned by a Rule are stored as a single Element. If Split Elements is selected, the results are stored as multiple Elements instead. A Rule with Split Elements selected must also be configured to return a list of objects. When the Rule runs, each object returned is represented by a separate Element. This setting is especially useful when writing a Rule intended to monitor a set of inventory. The Tripwire AWS S3 Storage, Azure Storage, and Google Storage Rules all use Split Elements so that each bucket or container is its own Element with its own set of attributes, and each Element is monitored for change individually. |
|
Element Name Filter |
If Split Elements is selected, CM names each created Element using its value for the key specified here. |
|
Element Unique ID Filter |
If Split Elements is selected, CM assigns a tracking ID to each created Element using its value for the key specified here. |
|
Attributes Filter |
Enter an optional JMESPath expression that can be used to extract attributes from each Element. This attribute data is used by the Dashboard Definition settings below, and also to trigger a Change Response script if the attribute values don't match the values defined in the script. |
Dashboard Definition Settings
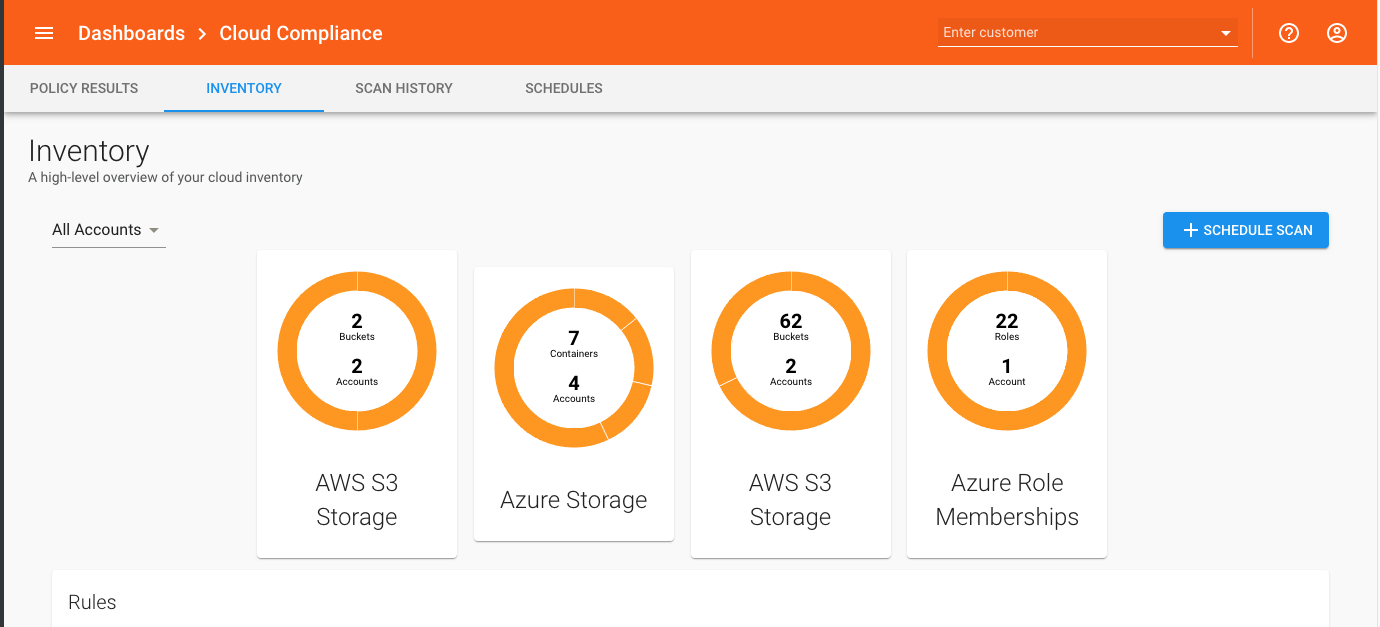
Dashboard Definition settings are used to configure the charts and tables in the Inventory tab of the Cloud dashboard. Dashboards can only be defined for Inventory Rules with Split Elements enabled.
If the Dashboard Definition setting is selected, the Inventory tab will display a Summary chart with the number of elements for the Rule across all scanned Cloud Accounts.
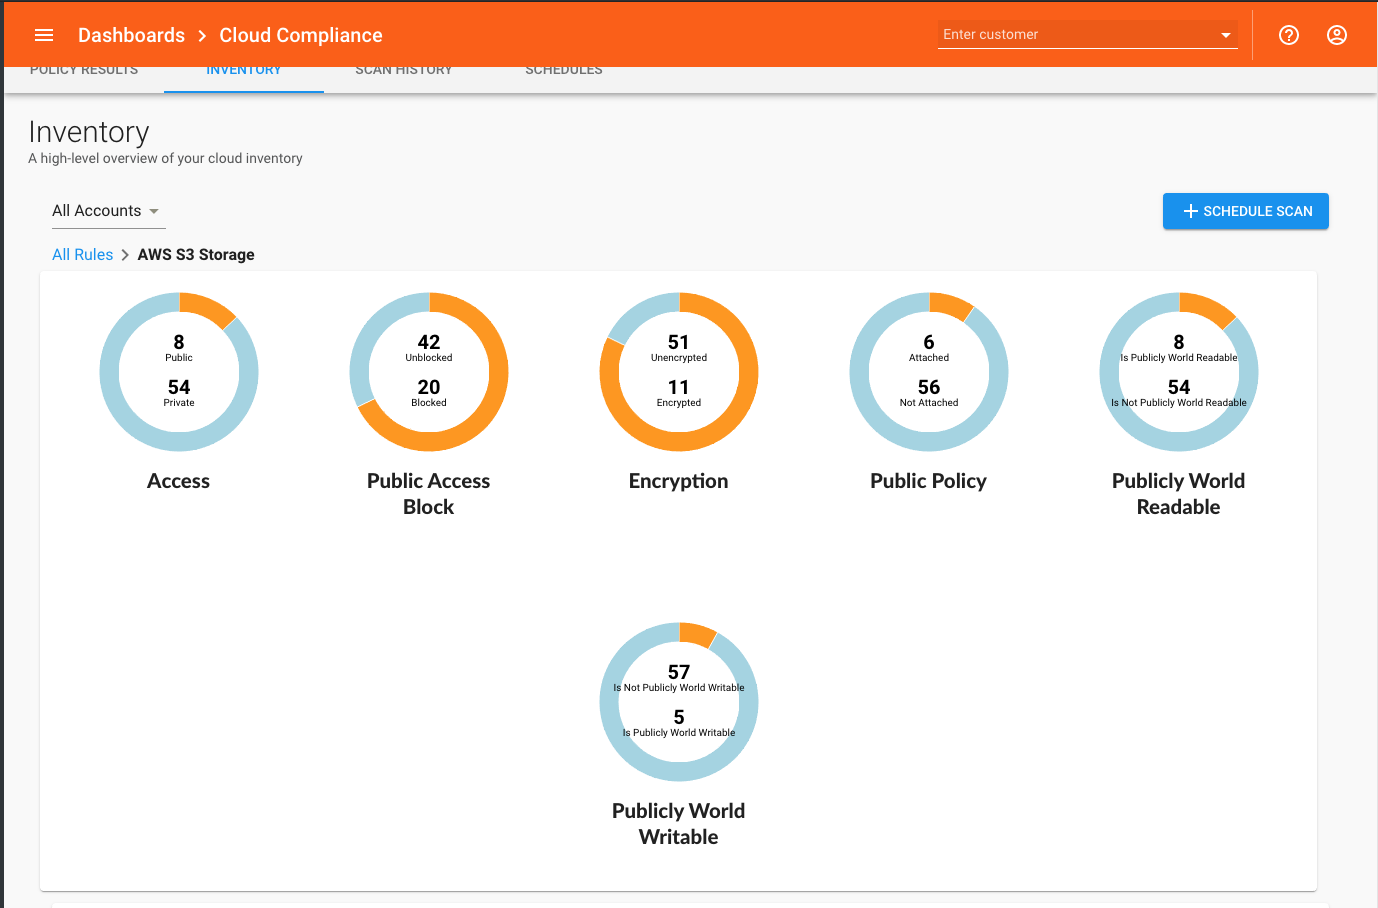
If you also define Charts, you can click through the Summary to see more detailed charts with information about good and bad values for multiple attributes.
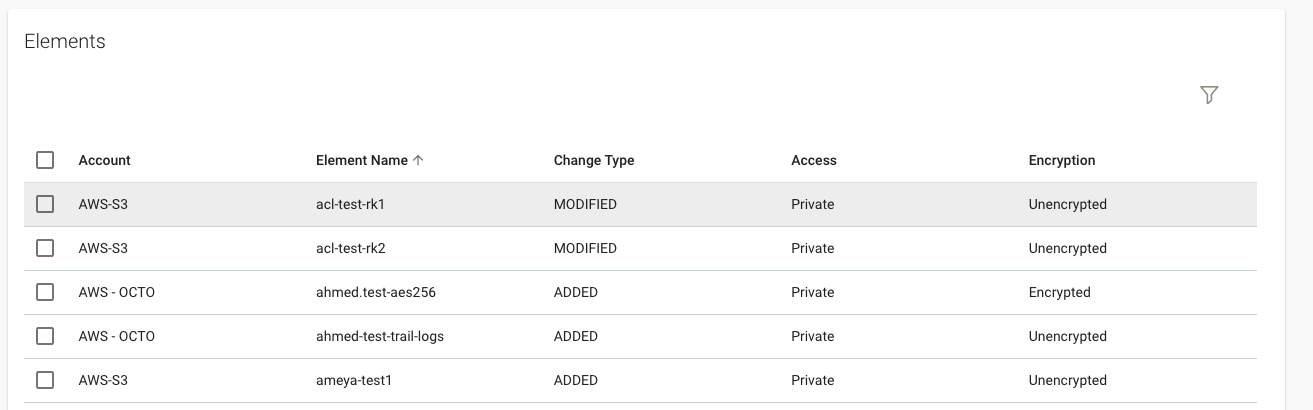
The Columns settings let you specify additional columns of attribute data (like Access below) to display in the Elements table on the Inventory tab.
|
Dashboard Definition |
If selected, the Inventory tab will include a Summary chart. |
|
Element Type Name |
The generic Element name to use in Summary charts. For example, Tripwire AWS S3 Rules use "Bucket". |
|
Element Type Name (Plural) |
The generic Element name to use in Summary charts, in plural form. For example, Tripwire AWS S3 Rules use "Buckets". |
|
Charts |
Define a different chart here for each attribute you want to track. To add a chart:
|
|
Columns |
Define additional attributes to display in the Elements table on the Inventory tab. To add a column:
|
Rule Type Settings
AWS rules can be used with these types of Cloud Accounts:
- AWS IAM User
- AWS External
- AWS IAM User (With EKS)
- AWS External (With EKS).
AWS rules use the AWS javascript SDK, which contains information on the Services and Methods that can be used in Configuration Manager.
The Service parameter is the name of a service within AWS, such as IAM or Cloudtrail, as defined in the SDK. See the SDK documentation for a complete list.
The Method parameter is the name of a particular function within the chosen Service. See the SDK documentation for a complete list.
The Method Parameters parameter is used when a Method requires additional parameters, such as the name of an object to operate on. See the SDK documentation for required method parameters.
For example, to retrieve the status of a particular cloud trail, you would use these values:
Service: CloudTrail
Method: getTrailStatus
Method Parameters:
{
"Name": "MyTrailName"
}
Azure rules are used with Azure or Azure (with AKS) Cloud Accounts.
Azure rules uses the Azure API for JavaScript and Azure Resource Manager libraries.
The Package parameter is the name of the service in the Services list, for example "security", "storage", or "mysql".
The Interface parameter can be found on the service page for an Azure service. For example for mysql, you may use the "servers" interface (or package).
The Management Client Parameters parameter can be used to pass any additional positional/ordered values required by the package or service constructor, as specified on the service page. For example, you could pass an ascLocation to the security service.
The Method parameter is also found on the service page for an Azure service. For example to list mysql servers, you may use the "list" method.
The Method Parameters parameter can be used to provide additional values to the method being used. For example, creating an object may require a name parameter.
For example, to list MySQL servers:
Package: mysql
Interface: servers
Method: list
Azure REST rules are used with Azure or Azure (with AKS) Cloud Accounts.
Azure REST rules make REST API calls, and can be used in cases where an API is not supported by the Azure or Microsoft Graph rule types.
The URL parameter is the Azure API endpoint to call. It can be any endpoint that supports the Azure identity platform.
The Options paramater includes additional options to pass to fetch, as in the REST rule type. The options for authenticating to the Azure API are added automatically.
Microsoft Graph rules are used with Azure or Azure (with AKS) Cloud Accounts.
Microsoft Graph rules use the Microsoft Graph REST API and the Microsoft Graph Client.
The API parameter is the API in the Graph REST API following the https://graph.microsoft.com/v1.0 portion of the url. These values can be found in the Microsoft Graph REST API documentation. For example "/users" or "/policies/identitySecurityDefaultsEnforcementPolicy"
The Select Fields parameter is a list of values which can be used to select the data returned. For example adding "displayName" would only return the displayName for each object.
The Order By parameter defines a sorting order. For example adding "created" might return results sorted by a created value. Not all queries support ordering.
The Query Filter parameter is used to filter results by a field value. For example a value of "startswith(displayName, 'test')" would filter objects with a name starting with test
For example, to list all users named Alice:
API: /users
Method: get
Query Filter: startswith(displayName, 'alice')
Context rules can be used with any type of Cloud Account.
Context rules return data retrieved by Prerequisite Rules minus secrets and login values. These rules are mostly useful for debugging, and can also be used to operate on Prerequisite Rule output without needing to run any other rule.
GCP rules work with these types of Cloud Accounts:
- GCP Service Account
- GCP External
- GCP Service Account (with GKE)
- GCP External (with GKE)
GCP rules use the Google Cloud Platform API.
The API parameter is a selection list of commonly used API endpoints. If the needed endpoint is not in the list, you may use the GCP REST rule type.
The Version parameter is for the API version portion of the Google API REST URL, and is filled in automatically if left blank.
The URL parameter is for the remainder of the URL after the API endpoint and version.
The Options parameter takes the same values as the REST rule type Options parameter.
For example, to gather virtual machine disk information, find the correct REST API details in the documentation - https://cloud.google.com/compute/docs/reference/rest/v1/disks/aggregatedList
API: compute
Version: v1
URL: /aggregated/disks
GCP REST rules work these types of Cloud Accounts:
- GCP Service Account
- GCP External
- GCP Service Account (with GKE)
- GCP External (with GKE)
GCP rules uses the Google Cloud Platform API like the standard GCP rule type, but they require a complete API URL.
The URL parameter is the complete googleapis url for the request.
The Options parameter takes the same values as the REST rule type Options parameter.
For example: to gather bigquery data set information, find the correct REST API details in the documentation - https://cloud.google.com/bigquery/docs/reference/rest/v2/datasets/list
URL: https://bigquery.googleapis.com/bigquery/v2/projects/${gcpProjectId}/datasets
GraphQL rules are most commonly used with Generic Cloud Accounts.
URL is the graphql endpoint, such as "https://example.com/gql/"
Options are additional options to pass to fetch, as in the REST rule type. You will likely need to provide an authentication header for your graphql service.
Query is the graphql query, such as
	query myBlogQuery($id: String!) {
	blog(id: $id) {
	title
	}
	}
Variables are graphql query variables which are passed into the query. For example you may add a key of "id" with a value of "1" to fetch the blog with id 1.
Kubernetes rules are used with these types of Cloud Accounts:
- AWS (with EKS)
- Azure (with AKS)
- GCP (with GKE)
The API group and resource names can be found in the Kubernetes API Reference.
API group/version is the consolidated API group and version, such as "apps/v1". This is the same as "apiVersion" in a Kubernetes YAML file.
Operation is "list" to list all resources of a given type or "read" to read a single resource by name.
Resource Kind is the type of resource to get, such as "Pod". This is the same as "kind" in a Kubernetes YAML file.
Namespace is the Kubernetes namespace of the resource, if it is a namespaced kind. This can be left blank to get resources for all namespaces.
Name is the name of a specific resource to get (if operation is "read").
Kubernetes REST rules are used with these types of Cloud Accounts:
- AWS (with EKS)
- Azure (with AKS)
- GCP (with GKE)
The Kubernetes REST rule type makes proxied REST API calls, and should only be used in special circumstances where a stable API is not available.
URL is the API endpoint to call.
Options are additional options to pass to fetch, as in the REST rule type. The options for authenticating to the Kubernetes API are added automatically.
Kubernetes All Resources rules are used with these types of Cloud Accounts:
- AWS (with EKS)
- Azure (with AKS)
- GCP (with GKE)
The Kubernetes All Resources rule type attempts to emulate the behavior of the kubectl get all command, and returns a combined list of several different resource types.
Namespace is the Kubernetes namespace to get all resources for. This can be left blank to get all resources for all namespaces.
Params rules simply return any values in the Params parameter as rule output. This may be useful for debugging, or for gathering specific data for a Prerequisite Rule.
REST rules are most commonly used with Generic Cloud Accounts. These rules are Fetch-based and take the same parameters.
The only required parameter is the URL, which by default will be accessed via a GET request.
If the response has a Content-Type header of application/json, it will be decoded and returned as-is.
If the response has a Content-Type header of text/*, it will be returned as an object with both the Content-Type and text body:
	{
	"contentType": "text/plain",
	"text": "This is a response"
	}
For any other Content-Type, the raw response data will be base64-encoded and returned along with the Content-Type:
	{
	  "contentType": "application/octet-stream",
	  "base64": "dGhpcyBpcyBhIHJlc3BvbnNlIQ=="
	}
The Options parameter is used to alter the request according to the Fetch documentation.
For example adding a "method" entry with the value "POST" and a "body" will cause the data to sent to the URL via HTTP POST.
	{"method": "POST"
	"body": "tripwire"
	}
Salesforce REST rules are used with Salesforce Cloud Accounts.
You can use the Salesforce "Rest Explorer" to find appropriate paths for gathering information: https://workbench.developerforce.com/restExplorer.php
For example performing a GET on /services/data/v50.0/folders in Salesforce Rest Explorer will return information about folders.
When configuring a Salesforce REST rule:
The version parameter should always be v50.0 but is left configurable for forward and backward compatibility.
The path parameter is the portion following /services/data/v50.0, so in this case would be /folders
A GET request for /services/data/v50.0/tooling/query?q=select+Metadata+from+SecuritySettings in Salesforce Rest Explorer returns security setting data
In this case, the following version and path are used:
version: v50.0
path: /tooling/query?q=select+Metadata+from+SecuritySettings
Salesforce Query rules are used with Salesforce Cloud Accounts. They are very similar to Salesforce REST rules but only operate on the query REST endpoint.
You will need to be familiar with writing Salesforce soql queries for obtaining information, but can use the Salesforce workbench to both experiment with writing soql, and also with sending queries via REST.
https://workbench.developerforce.com/query.php
https://workbench.developerforce.com/restExplorer.php
For example, using a GET request on /services/data/v50.0/search?q=FIND {user@tripwire.com} in Rest Explorer will return the salesforce id of that object.
You would configure a rule as follows:
The version parameter is always v50.0 but is left configurable for forward and backward compatibility.
The query parameter is FIND {user@tripwire.com}.
Zoom rules are used with Zoom Cloud Accounts.
Zoom rules use the Zoom API.
The Path parameter is the REST API path following any REST endpoint or version.
The Options parameter is used to alter the request according to the Fetch documentation.
For example: To list users, use the API documentation for listing users https://marketplace.zoom.us/docs/api-reference/zoom-api/users/users
Path: /users
Custom rules can be used with any type of Cloud Account.
Custom rules are used to connect a Custom Script to a rule. Custom Script output will returned as the rule's output.
The parameters available for a Custom rule are defined by the selected Custom Script.