Policies
Policies evaluate data collected by Policy Rules and uses it to measure compliance. Each Policy contains one or more levels of Policy Test Groups, which organize Policy Tests.
Policy Tests are the smallest unit of compliance measurement in CM, and they assign a pass/fail result to a single, specific configuration setting. Policy Tests can only be created as part of a Policy, but the same Policy Test can be used in multiple Policies and Groups.
|
Note: |
For an overview of Rules, Policies, and other types of content see Getting Started with Custom Content. |
|---|
Working with Policies
On the Policies page, you can work with existing Policies or create your own. Policies created by Tripwire (Author=Tripwire) are read-only, but you can duplicate them and then edit the duplicates.
To create a new Policy you first create the Policy itself, then populate it with one or more Policy Groups and finally add or create Policy Tests.
-
Navigate to Environment > Policy Management and select the Policies tab.
-
Click New.
-
In the New Policy dialog, complete these fields:
-
Name
-
Description
-
Account Types (Optional) is the type of Cloud Account this Policy was created for. A "Custom" Policy is for a Cloud Account that requires a Custom Script to access.
-
Operator describes the pass/fail relationship between this Policy and its child Policy Groups. All means the Policy only passes if all of the child Groups pass. Any means the Policy passes if any of the child Groups pass. None means the Policy passes only if none of the child Groups pass.
-
-
Click Save.
Once you save the Policy, the Test Groups section appears.
-
Click New Group.
-
In the New Test Group dialog, complete these fields:
-
Name
-
Description
-
Operator describes the pass/fail relationship between this Group and its child Groups and Tests. All means the Group only passes if all of the child Groups and Tests pass. Any means the Group passes if any of the child Groups or Tests pass. None means the Group passes only if none of the child Groups or Tests pass.
-
-
Click Save.
Once you save the Group, the Test Groups and Tests sections appear.
-
In the Tests section, you can create new Policy Tests or add existing ones.
 To create a new Policy Test
-
Click New Test.
-
On the New Test page, specify a Name for the new Test. Below Name, there are two tabs:
The Info tab includes description and manual remediation information. It also specifies the Rule used to collect data for the Test, and how that data is evaluated. For more information, see Info Tab Settings.
The Response tab controls the Response (automated remediation) available for a failing Test. For more information, see Response Tab Settings.
-
Fill out the fields on all relevant tabs and click Save at the bottom of the dialog.
Next you can debug the Policy by scanning a Cloud Account to see the results.
-
To debug the Policy, click Debug on the bottom of the page.
-
On the right side under Test Debug, select an appropriate Cloud Account for this Policy and click Execute.
CM scans the account with the specified Rule and displays the output.
-
If necessary, edit the settings on the left side until you get the results you want.
- Once you're satisfied, click Save again.
To add existing Policy Tests
-
Click Add Test.
-
In the Add Tests section, select the Tests you want to add.
-
At the bottom of the list of Tests, click Save.
-
-
After you're done creating and adding Policy Tests, click Policies at the top of the page to return to the main Policies tab.
To use the new Policy to scan a Cloud Account, you need to create a new Scan or add it to an existing Scan. For more information on working with Scans, see Schedules.
Policies created by Tripwire (Author=Tripwire) are read-only and can't be edited directly, but you can duplicate them and then edit the duplicates.
- Navigate to Environment > Policy Management and select the Policies tab.
-
To edit a non-Tripwire Policy, select it and click Edit.
To edit a Tripwire Policy, select it and click Duplicate. Then select the new Policy and click Edit.
-
In the Edit Policy dialog, edit any of the Policy-level settings if desired:
-
Name
-
Description
-
Account Types (Optional) is the type of Cloud Account this Policy was created for. A "Custom" Policy is for a Cloud Account that requires a Custom Script to access.
-
Operator describes the pass/fail relationship between this Policy and its child Policy Groups. All means the Policy only passes if all of the child Groups pass. Any means the Policy passes if any of the child Groups pass. None means the Policy passes only if none of the child Groups pass.
-
-
At the bottom of the page, navigate to the Policy Test Group you want to modify. You can create or add a new Policy Test or edit an existing one.
To create a new Policy Test
-
Click New Test.
-
On the New Test page, specify a Name for the new Test. Below Name, there are two tabs:
The Info tab includes description and manual remediation information. It also specifies the Rule used to collect data for the Test, and how that data is evaluated. For more information, see Info Tab Settings.
The Response tab controls the Response (automated remediation) available for a failing Test. For more information, see Response Tab Settings.
-
Fill out the fields on all relevant tabs and click Save at the bottom of the dialog.
Next you can debug the Policy by scanning a Cloud Account to see the results.
-
To debug the Policy, click Debug on the bottom of the page.
-
On the right side under Test Debug, select an appropriate Cloud Account for this Policy and click Execute.
CM scans the account with the specified Rule and displays the output.
-
If necessary, edit the settings on the left side until you get the results you want.
- Once you're satisfied, click Save again.
To add existing Policy Tests
-
Click Add Test.
-
In the Add Tests section, select the Tests you want to add.
-
At the bottom of the list of Tests, click Save.
To edit an existing Policy Test
-
Select the Test you want to edit, then click Edit.
-
On the Edit Test page, change the Name for the Test if desired. Below Name, there are two tabs:
The Info tab includes description and manual remediation information. It also specifies the Rule used to collect data for the Test, and how that data is evaluated. For more information, see Info Tab Settings.
The Response tab controls the Response (automated remediation) available for a failing Test. For more information, see Response Tab Settings.
-
Edit the desired fields and click Save at the bottom of the dialog.
Next you can debug the Policy by scanning a Cloud Account to see the results.
-
To debug the Policy, click Debug on the bottom of the page.
-
On the right side under Test Debug, select an appropriate Cloud Account for this Policy and click Execute.
CM scans the account with the specified Rule and displays the output.
-
If necessary, edit the settings on the left side until you get the results you want.
- Once you're satisfied, click Save again.
-
-
After you're done working with Policy Tests, click Policies at the top of the page to return to the main Policies tab.
Changes to a Policy will be reflected the next time the Policy is used in a Scan. For more information on working with Scans, see Schedules.
You can export a Policy (and the Policy Groups and Tests it contains) to a YAML file.
|
Note: |
If you re-import a Policy, the previous version of any part of it (the Policy itself, Policy Groups, Policy Tests, and even Custom Scripts referenced by those Tests) may be overwritten. An item will be overwritten if 1) the imported item has the same UUID as an existing item and 2) the imported item has been modified more recently than the existing item. |
|---|
To export a Policy:
- Navigate to Environment > Policy Management and select the Policies tab.
- Select the Policy you want to export, then select Export.
- Specify a name for the YAML file to export and select Save.
To import a Policy:
- Navigate to Environment > Policy Management and select the Policies tab.
- Select Import.
- Select the YAML file you want to import and select Save.
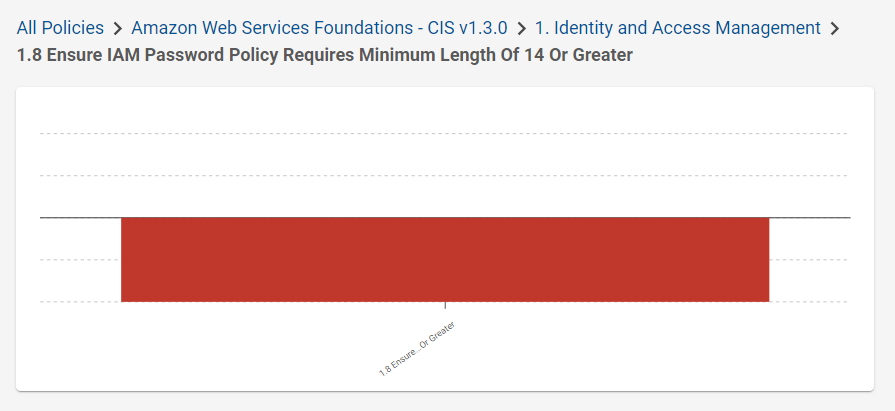
In this example, let's assume you're managing your AWS accounts using the CIS Policy for AWS. However, you need to change the minimum IAM password length requirement from 14 to 16 characters to comply with an internal requirement.
-
On the Cloud dashboard, use the chart and table to find the IAM password section of the CIS AWS Policy.
Note the path to the Policy Test in the breadcrumbs. Each level here corresponds to a group in the CIS Policy. You will need this path when you edit the Policy.
-
Navigate to Environment > Policy Management and select the Policy tab. Find the AWS CIS 1.3.0 Policy in the list.
Policies provided by Tripwire are read-only, so you'll create a duplicate Policy and edit that one.
-
Select the Policy and select Duplicate.
The duplicated Policy will have the same Name, but the Author will be Custom.

-
Select the new Policy and select Edit.
-
On the Edit Policy page, edit the Policy's Name to reflect the changes you're planning to make (for example "Amazon Web Services Foundations - CIS v1.3.0 - IAM Password 16").
-
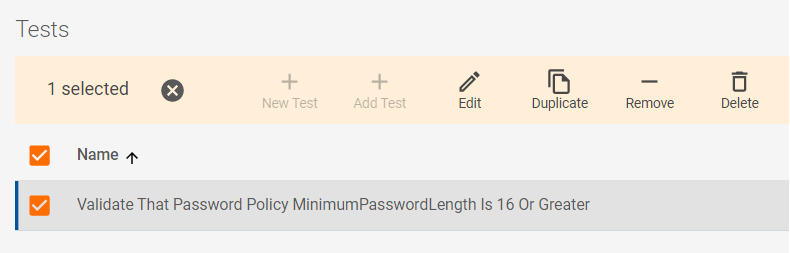
At the bottom of the page, use the path from the Cloud dashboard to navigate to the specific Policy Test you want to modify.
-
Select the Test, then select Edit.
The Edit Test page lists the Test's name, a description and manual remediation text. If you change a Policy Test, you should edit these to reflect the changes you make.
-
Scroll to the bottom of the page.
These fields specify the Rule used to collect data for the Test, and how that data is evaluated. For more information, see Info Tab Settings.
-
Edit the Evaluate Expression to change the value to:
MinimumPasswordLength!=null & MinimumPasswordLength>=`16`
This changes the minimum value required for this test to pass to 16 characters.
-
Click Save to save the change.
-
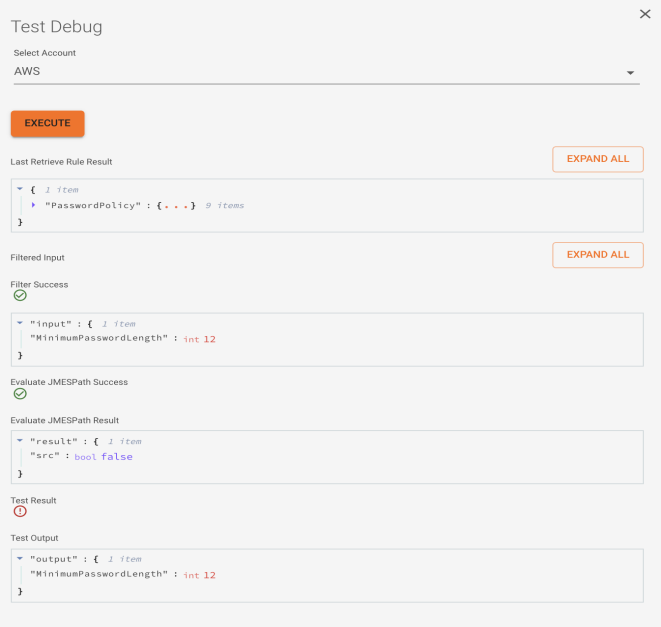
To see how this change affects the Policy, click Debug.
-
Under Test Debug, select an AWS Cloud Account and click Execute.
Configuration Manager will run this Test against the specified account and display the output.
Since your modified Policy is different from the standard CIS Policy, you would now need to update any existing Scans to specify the new version.
Once this is done, Configuration Manager will enforce the new 16 character password length each time the Policy is used.
Policy Test Reference
Info Tab Settings
|
Level |
This setting is used by some benchmarks (like CIS) to label a test as belonging to a certain "level" of the benchmark. |
|
Description |
Describes how the Test works, so it should be as descriptive as possible. |
|
Manual Remediation Instructions |
Provides manual remediation instructions to make the Test pass if it is failing. |
|
Rule |
Specifies the Policy Rule used to retrieve data for this Test. |
|
Output Description |
Describes the output of this Test in the Test Details section of the Cloud dashboard. |
|
Input Filter |
A JMESPath expression that CM uses to initially process data retrieved by a Policy Rule. |
|
Evaluation Type |
Specifies the language used for the Evaluate Expression below. |
|
Evaluate Expression |
Evaluates the filtered data to determine if the Test passes or fails. Here are some common JMESPath expressions:
|
Response Tab Settings
|
Response Description |
Describes exactly what this Policy Response does if a Test fails. This information appears in the Cloud dashboard when a user is configuring remediation, so it's important to explain how the remediation works and exactly what it's going to do. |
|
Validation Delay (Minutes)" |
After a Policy Response runs to remediate a failing Policy Test, CM immediately runs another Scan to confirm that the remediation has resolved the issue, and that the test is now passing. To prevent CM from running a validation Scan for this Response, change this setting to any value other than 0. (In a future implementation, you will be able to delay the start of the validation Scan in case a remediation requires extra time to complete.) |
|
Response Script |
Specifies a Policy Response Custom Script that users can run if this Test fails. If this Test fails, CM will display this Response in the Cloud dashboard and give users the option to run it one time, or to run it every time the Test fails. |
|
Add Parameter |
Many Policy Responses have configurable parameters. For example, a Response may reset the max password age for an account to a configurable number of days. Use this field to add parameters used by the Response, and to set a default value for each. In the Cloud dashboard, users will have the option to override each value. For example, say a Response Script requires a custom parameter maxPasswordAgeDays, which resets the max password age on a Cloud Account. If a Policy Test requires a maximum age of 14 days to pass, you would select maxPasswordAgeDays from the Add Parameter dropdown and enter 14 in that field. If a user wants a more secure value, they could override this setting (to 7 days, for example) in the Cloud dashboard. |