Creating an Azure Cloud Account
A Cloud Account is a cloud environment that Configuration Manager monitors. For more information about monitoring Cloud Accounts, see Getting Started with Configuration Manager.
To create an Azure Cloud Account, you must create an application registration (or service principal) with the appropriate permissions to access your account. You can do this using a provided script or manually.
Quick Start Video
This video provides a simplified overview of the procedure below.
-
In Configuration Manager, navigate to Environment > Cloud Accounts and click New.
-
In the New Cloud Account pane, enter a Name and Description to identify this account.
-
Select Azure as the account Type.
-
Open Azure Cloud Shell, or use a local bash shell with the Azure CLI installed.
-
Copy the command from the bottom of the New Cloud Account pane. This command creates an application registration (aka service principal) with the appropriate permissions
Remove remediation from the command line if you don't want Configuration Manager to have permission to automatically resolve configuration issues.
-
Review the script if desired, and then paste and run it.
Note:
If the script output includes an error about granting admin consent, you will need to visit the Azure portal after creating the account.
-
In Cloud Shell, select Upload/Download files > Download and download account.json. Save this file in a secure location.

-
Click Account File at the bottom of the pane to upload the account.json file and fill out the remaining fields.
-
Click Save to create the new Cloud Account.
-
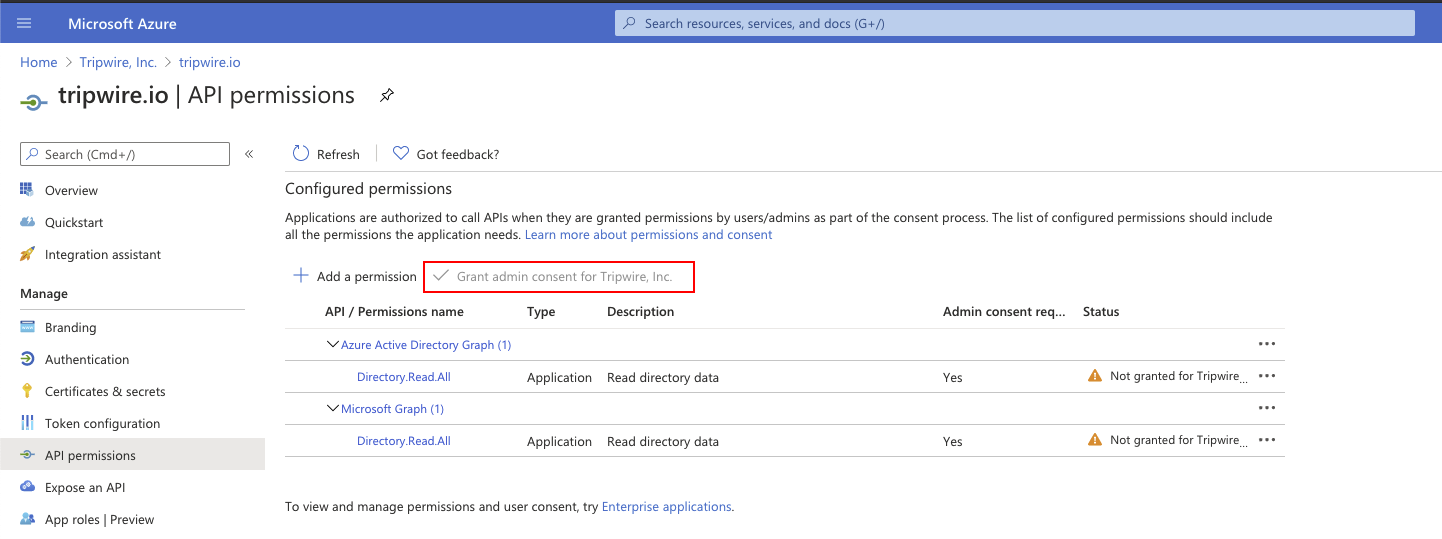
If you were prompted for admin consent earlier, visit the Azure API permissions page and click Grant admin content for Tripwire, Inc.
Note:
If you run this script more than once (for example, to create different Cloud Accounts for different Subscriptions in the same tenant), the script will assign the same service account to each Subscription, but it will reset the account password each time it runs.
To fix this issue, each time you run the script you need to copy the Client Secrets value for the new Cloud Account and update that value in all existing Azure Cloud Accounts.
Alternately, follow manual configuration steps 6 and 7 to add roles for each Subscription before running the script. Then you can use the same account.json file to create each Cloud Account, but manually edit the Subscription ID each time.
First you need to configure an application registration (or service principal) with the appropriate permissions to access your account.
- Log in to your Azure Portal with an account that has permissions to add application registrations and set roles. Expand the portal menu by clicking the menu icon in the upper left corner if needed.
- Gather the Tenant ID:
- Select the tab for Azure Active Directory.
- Select Properties.
- Record the Tenant ID value, which will be used for your Azure Cloud Account.
- Create the Application Registration and gather the Application ID:
- Select the tab for Azure Active Directory.
- Select App Registrations.
- Select New registration and enter a Name like "Tripwire.io". Record the name in case you need to refer to the App Registration name later.
- Select Register.
- Store the Application (client) ID. If returned to the application list, select your newly created application from the list of All Applications.
- Record the Application (client) ID value, which will be used for your Azure Cloud Account.
- Next set a Password to use for the Application Registration.
- Select Certificates & Secrets for your new Application Registration.
- Select New client secret.
- In the Description section, enter a Description like "Tripwire.io".
- Select an Expires duration. The new client secret will be displayed under the Client secrets heading.
- Store the secret from the Value field.
- Record the value in the Value field, which will be used for your Azure Cloud Account.
Note:
A new client secret will need to be set for Tripwire.io to function upon secret expiration.
- Assign permissions to the Application Registration:
- Return to the application registration panel (Azure Active Directory > App Registrations).
- Select your new Application Registration.
- Select API permissions.
- Select Add a permission and then Microsoft Graph.
- Select Application permissions.
- Check Directory.Read.All and Policy.Read.All under the Directory category.
- Select Add permissions to save.
- Wait 10 seconds before selecting Grant admin consent for Default Directory and Yes to grant permissions.
- Assign Application Registration Roles on Subscriptions:
- Within the Azure Home Portal, select Subscriptions.
- Record the Subscription ID of the Subscription you want to monitor. This will be used in the Subscription field of your Azure Cloud Account.
- Select the Subscription you want to monitor.
- Select Access Control (IAM).
- Select Add and then Add role assignment.
- From the Role drop-down, select Reader.
- In the Select field, select the Registered Application created earlier. You may need to begin entering the Registered Application name in order to select it.
- Select Save.
- (Optional) To enable Configuration Manager to remediate configuration issues, you must assign the Network Contributor, Contributor, and Storage Account Key Operator Service Role roles:
- Select Add and then Add role assignment.
- From the Role drop-down, select Network Contributor.
- In the Select field, select your new app.
- Select Save.
- Repeat steps 6 and 7 for each Subscription you want Configuration Manager to monitor.
Repeat these steps to add the Contributor and Storage Account Key Operator Service Role roles.
Now create the Cloud Account in Configuration Manager:
-
In Configuration Manager, navigate to Environment > Cloud Accounts and click New.
-
In the New Cloud Account pane, enter a Name and Description to identify this account.
-
Select Azure as the account Type.
-
Fill in the other fields using the information you collected.
-
Click Save to create the new Cloud Account.